Showing posts with label crafts. Show all posts

Monday, December 17, 2012

Event DIY: Pennant Banner

Early on in the stages of wedding planning, we put a lot of thought into how we wanted to share the news about our big day with friends and family in advance. Save the Dates are the first way to showcase your wedding style and theme with the guests, and help ensure that as many of them as possible can attend. I didn't want to blow through a ton of money on these things, though, since honestly, most of our guests are close friends and family that knew from Day 1 when our wedding would be! I did, however, want to give everyone something to look forward to before the formal invites went out :)

We found inspiration for our Save the Date through Martha Stewart (love her) and this cute banner idea. While I didn't follow the template they provided, you certainly could. I just happen to like our custom version better :P

Once that we had something in mind, we headed off to Jo-Ann's for the supplies. We picked out card stock that had an elegant, but neutral, design and purchased enough sheets to make two triangle-shaped pennants per page. We also picked up ribbon in our primary wedding colors, navy blue and kelly green, with enough to reach through the full length of all the pennants and leave some to hold on each end. Then, we headed over to The School Box, one of my mom's favorite teacher spots. They have great prices on huge letters and numbers that you can easily glue down onto paper, bulletin boards or banners.

Here's how I put everything together: After my mom traced and cut the pennant shapes for me at school with a paper cutter, I punched out the letters and laid them out on the pennants to see where they should be positioned.

Note the wine glass. Arts and crafts requires some libation in my house :)

Once I had them all laid out, I started glueing the shapes down. I used a damp cloth to wipe off any excess glue.


Once the letters were all in place, I put them in between some heavy books to dry flat. Then I used a hole punch to cut out the holes before stringing through the double strand of ribbon. I twisted the ribbon a bit as it went through so that you could see both colors.


Yay, done! We brought the banner to our engagement photo shoot and sent our inspiration photos to our photographer in advance so that we could work it into our afternoon with them.

This banner would be an easy craft for a birthday party, engagement celebration or any DIY event. I love that you can customize it with any colors, letter styles or ribbons for any style event. We are planning on repurposing the banner at our wedding as part of our décor, too, making things for the big day that much easier.

Have you made any similar pennant banners? What was your inspiration?

Photobucket

Sunday, November 13, 2011

Paint the Town Red

Wouldn't this be adorable inside a home using the colors of your decor, and with letters that say "HOME" for a front entryway or "EAT" for use in the kitchen?


Get directions for how to make this fun creation over on Handmake My Day. It's the latest addition to my own inspiration files! :)

Photobucket

Wednesday, October 5, 2011

Autumnal Pumpkins

Truth: I am not much of a crafter. Sure, I can imitate and copy some awesome crafty ideas here and there, and I have some creativity of my own sometimes, too, but I am not a natural paint-and-art-supplies type crafter. I do better with the projects where you buy a few materials and put them together. Using brushes is a little beyond me.

But that doesn't mean I don't try! I saw this layout and HAD to try it myself.

Image and tutorial via Wild Ink

Image and tutorial via Wild Ink
How beautiful! I was in! And of course, even though I knew that I should follow those directions since it's not my natural "area" of expertise to begin with, I had to amend a few things to fit me :) First, these were real pumpkins, and I wanted to make them last beyond this year, so I found some "real" looking pumpkins on sale at Michael's, and picked them up with a coupon to make them pretty cheap.

Image via Michael's
Bonus - I just now saw on the Michael's site that these inexpensive foam pumpkins are also carvable! That could be fun to apply the glitter and also make it a jack-o-lantern. The inside is pumpkin-orange just like a "real" one.

Secondly, I don't have a massive side table to display a huge arrangement of pumpkins on, and already have a "mantle" with my lantern display for Fall. So I decided to just make two to start and see how they went, and I could put them on the wine rack in the dining room. I chose a black round pumpkin with silver glitter, and an orange tall pumpkin with copper/gold glitter.

Back to my non-painting skills. Rather than follow the directions, I winged it at the store and picked up spray paint and paint-on-glitter instead of actual dry glitter to be applied on top of glue. I thought I was being more efficient. Ha! Paint-on glitter does not go on as easily, and leaves streaks, FYI. Use the real stuff and don't be lazy like me. It ends up being more work in the end to add more coats.


The results, while not the same glitterific pumpkins that the tutorial would have turned out, still work in my space for what I paid for it. It took a few coats of both, but I like how they look, especially since in total this cost about $12 in supplies for two! The black one can also be repurposed for a Halloween centerpiece with the addition of some black candles and a fake crow or two.

Are you a crafty person? What Fall crafts have you taken on so far this year?

Photobucket

Sunday, September 25, 2011

Sweater Sweetness

I am so beyond ready for the colder weather to arrive. These early-AM chilly temps are right up my alley. And then, like clockwork, it's still heating up to a ridiculous level for what is now "Fall." At least, I guess, I do not live in SoCal, Florida or South Texas where they don't even get to experience those slight hints of the season change!

Here's hoping it snows again either in GA or
in NYC during our annual holiday visit :)
I'm not letting the warm weather distract me from preparing for the colder stuff to come, though. Before we know it, Fall and then Winter will be here to stay. Today, despite this 85 degree day we have going on, I picked up my new snow boots that arrived off of back order sale at REI! 

They are Sorels and they are amazing. I want to wear them with leggings and a snow jacket ASAP. The best thing about these boots are that they are timeless. Even if we don't get another ice storm for a few years, these will still be in style and will look great no many how many wears later. I can't really say the same thing for those boots that are all white and puffy with fur :)

The "mantle" is ready for Fall with the lantern display, and I have my Pumpkin Pie Yankee candle burning a few times a week. The crock-pot is back in consistent rotation for our dinners, and all that is left is to do a final wardrobe-swap for the long-sleeves, tights and sweaters.

At the end of each season, I make it a point to purge items from my drawers and closet as I swap out the seasonal boxes of clothes. Ready to go to Goodwill this time are a few over-worn summer work blouses and a skirt that just does not do it for me anymore. My rule of thumb is that if I haven't worn it all that season, and don't see myself wearing it again next season, in the donation bag it goes! That gives me that much more room for new clothes, I figure :) More to come on that soon - I have a closet clothes makeover coming later this week!

There are a few sweaters that I just can not bring myself to donate each year as I trade out clothes, though. This one was a favorite buy from GAP circa 2005, but the boxy shape and heavy weight make it pretty impractical for Atlanta weather. I haven't worn it in a few years, but I absolutely love the colors and softness of the cotton.


This one was a gift many, many years ago - it's a high-quality Charter Club sweater and used to look adorable over a collared button-up. Over 10 years later, though, the shape does not really flatter my body anymore.


I have kept these two sweaters, along with a few others, each season, and they take up precious room in my out-of-season clothes bins. I know that I could donate them, but I still have an emotional connection to them both, and want to figure out a way to keep them around without having to wear them. Perhaps as a sweater pillow?

Source and Tutorial

Love the toggles on this one, how fabulous.
Or maybe a coffee cozy that you can re-use over and over again!

Seen on Elements of Style. Purchase via Etsy.
How about some cozy cable mittens? These would be cute using that striped sweater ...

Source and Tutorial
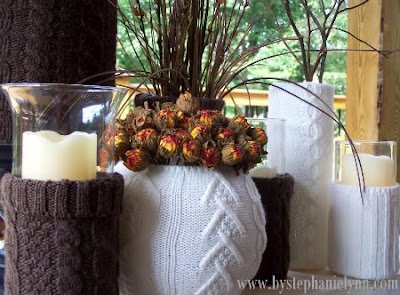
The latest option I stumbled past were these adorable sweater vase covers!


My crafting side is itching to make one or two of these out of my much-loved knits. What would you do with your extra woolen wear?

Photobucket

Friday, December 24, 2010

After-Christmas Crafting

A Note to my Readers: I am going to be out of town over the next week, spending wonderful time with family and friends. We return on New Year's Eve, and I can't wait to share stories of our trips with you. Have a wonderful and safe holiday! XOXOX.
------------------------------------------
Everyone hears about the sales that go on the week AFTER Christmas. All holiday-themed items are all on huge discount everywhere you look. Actually, a trip to Cost Plus World Market last weekend proved that such things are already being slashed in prices. All holiday items there were at least 50 if not 75% off. That sure was beneficial for me as I picked up a last few gift wrap items!

I know a lot of people aren't ones to instinctively buy winter clothes in April, or pick up last Spring's picnic items when the temperatures hit 55 that Fall, but buying items after their season is one of the most budget-friendly ways of stocking up. This year, I pulled out a brand new set of snowmen salt and pepper shakers that I received last year. It was such a treat to have new items to put into rotation with my holiday decorations!

I highly recommend stopping by your local arts and crafts stores next week (or Sunday, if you are hardcore haha) to pick up some of the discounted items. Think wrapping paper, cards, ribbon, bows and ornaments.

While you are it, and especially if you are going to be at home with the kids or on vacation from work, why not spend that time doing some crafts with those items? There is nothing like having homemade items to give as gifts in 2011, or to put on display in your own home.

Here are a few suggestions:

1. Pick up boxes of shiny ornaments (big YAY if they are only a few dollars each!), a plain green or grapevine wreath and a simple glue gun, and put together a gorgeous wreath for your door. This is one of my FAVORITE crafts I have ever made for myself.

2. Buy basic ball ornaments, and use some fine glitter and craft glue to turn them into sparkly balls to fill up your tree or give away to friends.

3. Make homemade gift tags to use next year with old Christmas cards. Cut off the back part of the card, and be sure to use cards without any written messages or 2010-type dates on them. Punch a hole in the upper left, thread in some ribbon and voila, done.

4. Surplus oversize holiday napkins from the sale racks can be turned into festive decorative pillows with a little stuffing and some thread. Check out an easy tutorial on one of my favorite crafty blogs, Bargain Hoot. 

Happy Crafting, and Happy Holidays!

Photobucket

Friday, October 29, 2010

Last-Minute Ghouly Ideas

If you are like me, Halloween has just absolutely snuck up on all of us. I thought it was just yesterday that I was posting about summer vacations and the cruise!

Whether you are ready for it or not, the weekend is upon us. For a lot of you, that means the kiddos are going to come a-knockin' on Sunday afternoon and evening, and candy shall be had. For others of us, the get-together might be more grown-up in nature, meeting up before heading out on the town. Either way, is your home ready for the visitors?

I have been ear-marking a special magazine edition of Woman's Day called "Budget Celebrations: The Hostess Guide For Year-Round Entertaining on a Dime." This abridged version of the full-scale book hit the magazine racks last month, and features easy decorating and cooking ideas for the holidays from now through the New Year. (Note: the full book features holiday ideas for the entire year, and would be a perfect gift for any hostess friend!)

If you are in the mood for some last-minute easy ideas for Sunday, these things might be right up your alley. Most of the supplies can be found at your local Target or grocery store, and can be whipped up in no time.

Like these ghost decals for your front door, or lanterns made out of simple votives. These would be simple to make with a pair of scissors and craft paper or black sticky paper.


Pumpkin Patch Bites -- awww LOVE these. You can't beat hand-held ham and cheese melts. 


And while I am at it, from the Woman's Day website, how fun are these? If you have a glue gun, you can make these in probably 20 minutes, and they could even last year-to-year.


Enjoy crafting -- and enjoy the fun day!

PS. Check out my mummy dogs! BIG success and oh so easy! They were perfect with ketchup/mustard and a big salad.


Wednesday, September 9, 2009

Bachelorette Swag

This past weekend I had the pleasure of joining a bunch of ladies out on the town for my good friend Ashley's Bachelorette party (she is a loyal reader of Bhead Betty - love you Ash!).

The Maid of Honor was planning most of the evening but asked that I help with some of Ashley's and the group's attire for the night. Meaning, I got to go buy some tacky Bachelorette stuff at Party City, hoorah!

However, when I got there, I saw that the selection wasn't great, and nothing really "fit" our group. So I took some inspiration from some buttons they had on display, and headed towards Michael's to get crafty.

I picked up some plain wooden flat ovals as buttons, some glitter glue, hot pink paint, button backings, and a white boa. I painted each of the wooden ovals with a few coats of hot pink paint (children's washable paint = $2!) and let them dry for a bit.

Taking the hint from the buttons at the store, I then used my trusty black Sharpie to write a descriptor on each button - Flirty, Wild, etc. I used the Sharpie again to add on rotating dots with the glitter glue around the borders. Here they are while drying:

From there I cut the white boa down in size, and glued it on with some craft glue to the outside of Ashley's Bachelorette button, so that she would stand out from the rest of us ... in case her tiara, sash, blinking oversized ring, and blinking Bachelorette mug didn't give her away.

Check out the finished product! The girls loved them and it serves as a fun memento from the night. And with the cheap cost of supplies, they only put me out about $15 and a few hours of drying time. Happy Bachelorette, Ashley!